


Rainwater harvesting is an eco-friendly and cost-effective way to gather and store water for different uses, such as watering your cultivation, washing your car, or indeed flushing toilets.
Introducing a DIY rainwater harvesting system may be a moderately direct handle that can be finished with fundamental instruments and materials.
In this article, we’ll give a step-by-step outline of how to set up your own diy rainwater harvesting system.
Step 1: Plan and Design
Sometime recently you started, surveying your property to decide the most excellent area for your rainwater harvesting system.
Select a spot where water runoff is promptly available, such as close to a downspout or root canal.
Consider the measure of your roof and the sum of precipitation in your range to decide the capacity of your system.
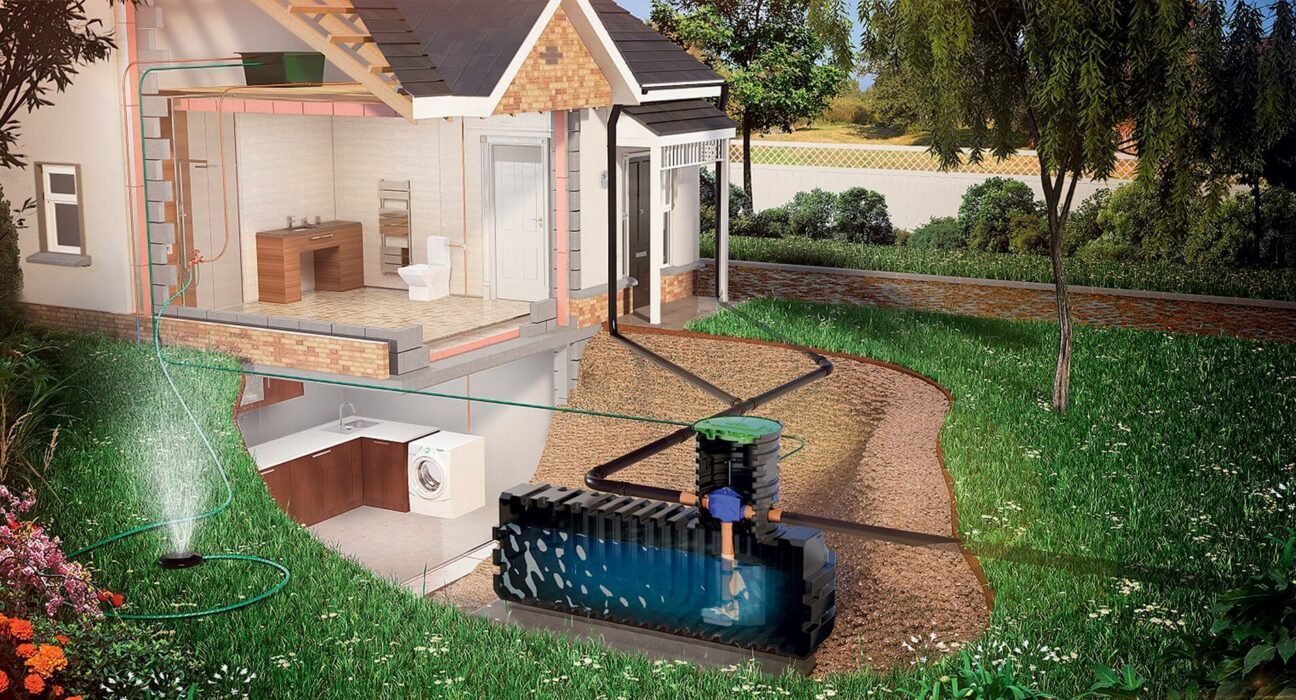
Portray out a plan that incorporates vital components, such as canals, downspouts, a capacity tank, and a filtration system.
Step 2: Assemble Materials
Another, assemble all the materials and apparatuses you’ll require for the establishment handle. This may incorporate:
- Water collection barrel or tank
- PVC channels and fittings
- Canal watches
- Hose bib/spigot
- Concrete pieces or a stage for the tank
- Teflon tape
- Bore and gap saw
- Saw for cutting PVC channels
- Level
- Measuring tape
Step 3: Install Gutters and Downspouts
If you do not as of now have canals and downspouts introduced, this can be the primary step.
Connect canals along the edge of your roofline, guaranteeing they slant marginally descending toward the downspout.
Introduce downspouts to coordinate water from the gutters into your collection barrel or tank. Utilize canal watches to avoid clears out and flotsam and jetsam from clogging the framework.
Step 4:Prepare the Collection Area
Position your water collection barrel or tank within the assigned region. Guarantee the surface is level and steady, utilizing concrete squares or a stage if is vital.
If you’re employing a barrel, drill a gap close to the beat for the downspout to nourish into. For bigger tanks, utilize a gap saw to form an opening for the gulf pipe.
Step 5:Connect the Components
Interface PVC channels and fittings to make a pathway for the water to stream from the downspout into the capacity tank.
Utilize Teflon tape to seal strung associations and avoid spills. Introduce a hose kiddie apron or spigot close to the foot of the tank to permit simple get to the put-away water.
Step 6: Add a Filtration System
To ensure the quality of the collected water, consider adding a filtration system. This can incorporate a working screen or channel at the entrance of the downspout to capture flotsam and jetsam, as well as a first flush diverter to divert the beginning runoff, which may contain contaminants from the roof surface.
Step 7: Test and Maintain
Once your rainwater harvesting system is introduced, test it by permitting water to stream into the tank and checking for any spills or issues.
Frequently review and keep up the framework by cleaning canals, evacuating flotsam and jetsam, and checking for any signs of harm or wear.
Faqs Regarding Rainwater Harvesting System
Here are some of the most common question we got asked regarding rainwater harvesting system:
Is Water Secure For Drinking?
Whereas water is generally safe for non-potable employment such as water systems and washing, it may contain toxins or contaminants from the roof surface.
For drinking purposes, rainwater ought to be legitimately sifted and treated to guarantee its security.
How Much Water Can I Anticipate To Collect?
The sum of water you can collect depends on components such as the measure of your roof, the surface region accessible for collection, and the sum of precipitation in your area.
As a common run show of thumb, one inch of rainfall on a 1,000-square-foot roof can surrender around 600 gallons of water.
Do I Require An Allowance To Introduce A Water-Collecting Framework?
Allow necessities to shift depending on your area and the estimate of the system.
Check together with your nearby building office or water specialist to decide on the off chance that grants are required for the rainwater collecting system in your zone.
How Can I Guarantee My Water Harvesting System Is Ecologically Inviting?
To play down natural effects, select non-toxic materials for your system, such as food-grade barrels or tanks.
Properly keep up the system to anticipate spills and defilement, and maintain a strategic distance from collecting water from rooftops treated with destructive chemicals or coatings.
Also Read: Budget-Friendly Landscaping Ideas For Enhancing Curb Appeal
Conclusion
Introducing a DIY water harvesting system could be a viable way to moderate water, diminish utility costs, and reduce your natural impression.
By taking after this step-by-step information and consolidating many key components like canals, downspouts, a capacity tank, and a filtration system, you can make a solid and productive water-harvesting system for your house.
With normal upkeep and appropriate care, your system can give a feasible source of water for different family needs for a long time to come.


Leave feedback about this Cancel Reply